
How to Prepare and Use Diffusers and Dechlorinators in Fire Hydrant Flow Testing (NFPA 291)
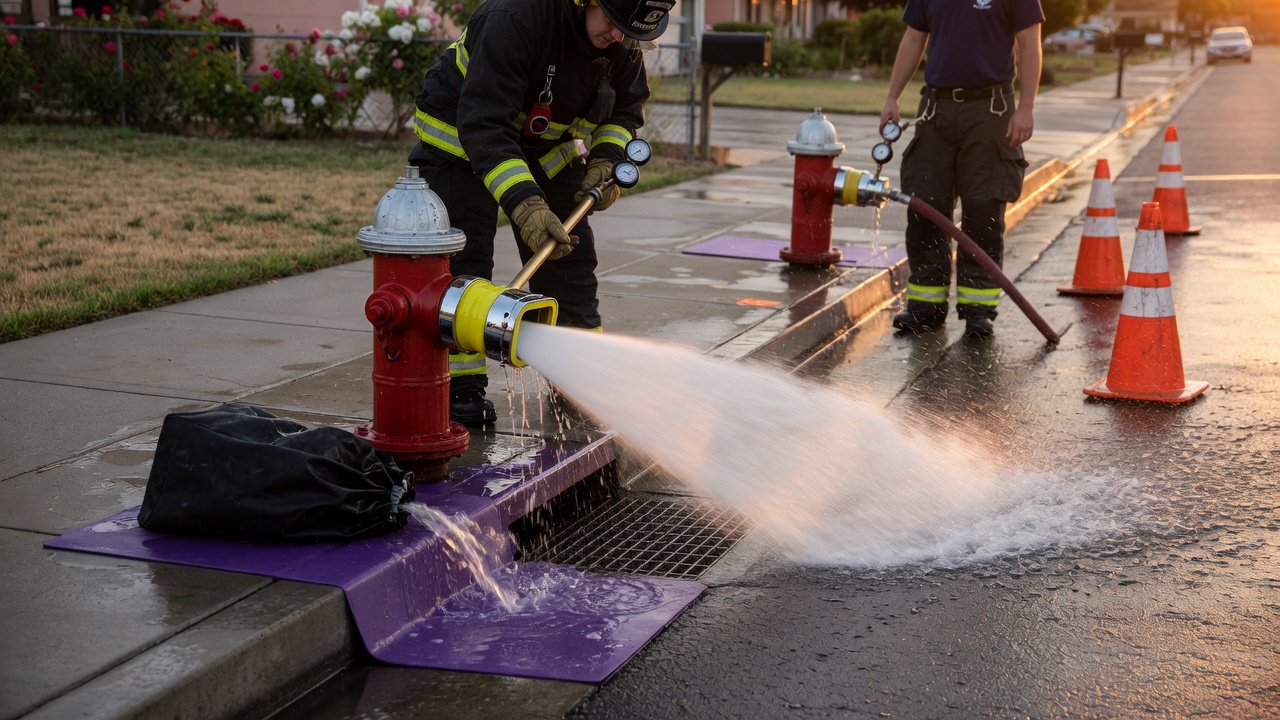
The Dual Mandate: Control Discharge Without Corrupting NFPA 291 Data
Diffusers and dechlorinators are not optional add-ons you reach for after the test plan is locked. They belong inside the measurement chain itself—after you have selected the flow and residual hydrants, and before you capture the pitot and residual pressures that determine available fire flow. Their mandate is simultaneous: keep people and property safe from the energy of the stream, keep residual chlorine inside environmental discharge limits, and leave the velocity profile clean enough that a pitot reading still produces a valid Q.
Each of those requirements fails in a different way when the hardware is ignored or staged poorly. Uncontrolled stream energy can injure crews, damage parked vehicles or landscaping, and create ice or flooding hazards. Mist and splash driven back into gauges or across the pitot face corrupt the differential that underpins the flow calculation. Chlorine residual that reaches a storm drain or waterway can violate discharge permits and harm aquatic life. One piece of equipment—the diffuser, often paired with a dechlorinator—either prevents all three failure modes or introduces them.
That is why this equipment layer must be planned with the same discipline as hydrant selection and gauge placement. It is not a cleanup step performed after the numbers are already taken. Treating it as part of the chain keeps friction losses, turbulence, and aiming errors from quietly invalidating the test while you stay inside public-safety and environmental bounds.
What follows stays tightly on those discharge-hardware decisions. This guide will not re-walk the full main-capacity test procedure, C-factor theory, or the graphing of residual curves; those are assumed background. The focus remains on choosing, preparing, and staging diffusers and dechlorinators so the pitot reading stays trustworthy and the water that leaves the hydrant does not create a safety or compliance problem of its own.
Match Diffuser Geometry to Outlet, Aim Path, and Pitot Access
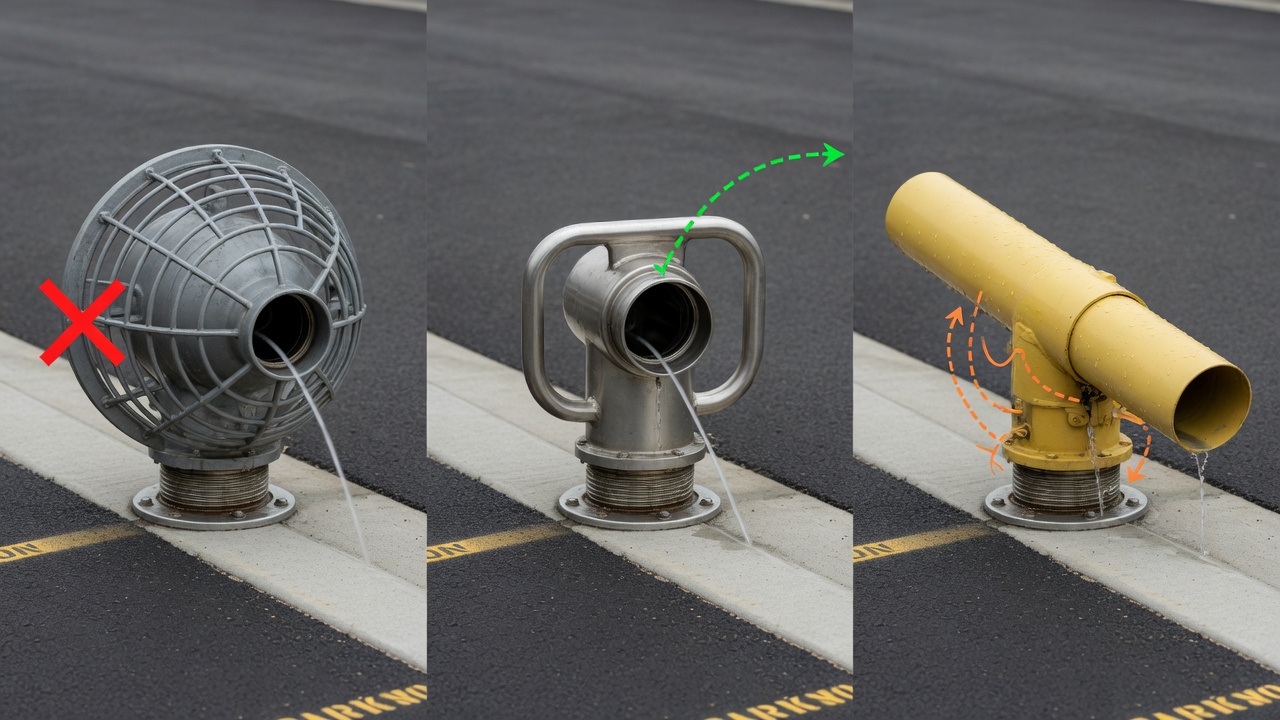
That same dual mandate—safe discharge and uncorrupted pitot data—starts with the hardware that sits on the flow orifice itself. Diffuser geometry decides how the stream is broken, how much backpressure builds against the outlet, and whether a standard pitot blade can still sit cleanly in the vena contracta. Choose poorly and you trade one problem for another: either an uncontrolled jet or a reading that no longer represents true discharge.
How common styles break the stream
Three families dominate field kits. Smoothbore tips with a short diffuser cone or perforated basket simply fan the jet; they add little resistance but leave a relatively coherent core that still needs careful aiming. Playpipe-style barrels with internal vanes or screens shred the stream more aggressively and drop velocity faster, yet the extra restriction can raise outlet pressure enough to shift the effective coefficient if the hydrant is already near its capacity limit. Purpose-built flow-test diffusers combine a short barrel, radial ports or slotted cages, and a side or front window sized for a pitot tube; when the window is correctly located they keep the measurement plane free of swirl while directing the bulk of the water downward or along the curb.
| Diffuser style | Stream breakup | Backpressure risk | Standard pitot access |
|---|---|---|---|
| Smoothbore + short cone/basket | Moderate fan; core remains | Low | Yes, if cone is short and open |
| Playpipe with vanes/screens | Aggressive shredding | Moderate to high | Often awkward; angle forced off-axis |
| Purpose-built flow-test diffuser | Radial ports or slots; controlled spray | Designed low-to-moderate | Yes—dedicated pitot window or slot |
Selection criteria that keep the measurement honest
Match the diffuser first to the outlet you will actually open. A 2½-inch nozzle needs a compact unit that threads or clamps without adapters that introduce eccentricity; steamer (4½-inch) outlets can accept larger cages but demand a secure latch or chain so the assembly cannot walk under thrust. Expected flow band matters next: light residential tests tolerate a simple basket, while high-volume commercial or main tests need generous open area so the diffuser itself does not become the limiting orifice. Street geometry finishes the decision—curb-line discharge favors downward or side-port designs that keep water off parked cars and out of traffic lanes; steep grade or limited right-of-way may require a longer playpipe barrel aimed safely downhill even if pitot access becomes slightly less ideal.
Reject any geometry that forces the pitot into an oblique angle or places the tip inside a swirling wake. Off-axis placement and induced rotation both change the velocity profile the blade sees, quietly altering the discharge you calculate even though the hydrant itself is unchanged. Likewise discard hardware whose vanes are bent, ports clogged with debris or mineral scale, or gaskets torn or missing; any of these defects will shift the spray pattern mid-test and can throw residual chlorine contact or runoff control off at the same moment the pitot reading drifts.
A quick pre-test inspection—sight down the barrel, flex the vanes, confirm gasket seating, and verify the pitot window is clear—takes seconds and protects both the data and the street. Once the diffuser geometry is matched and sound, the next concern is sizing and staging the dechlorinator that will treat the water after it leaves that controlled spray.
Match Dechlorinator Capacity to Test Flow and Contact Time
That dechlorinator is not a generic “add chlorine remover and go” accessory. Hydrant flow tests are short, high-volume events, so the unit has to neutralize residual chlorine across the flow band you actually expect from the outlet—not the brochure’s maximum rating under ideal, long-duration conditions. Tablet feeders and small in-line cartridges suit modest 2½-inch flows when contact path is long enough and media is fresh. Bulk media bags, L-shaped or trough-style units, and mat systems handle steamer-outlet bands and the sudden surge when the hydrant is opened fully. Choose by expected gallons per minute and how many minutes the stream will run, then confirm the treated path still leaves room for safe aiming and pitot access at the diffuser.
Neutralization is a flow-rate and contact-time problem. Free chlorine has to meet enough active media for long enough to drop below the local discharge limit before water reaches the curb or storm inlet. Undersized media volume, a short travel path through the bed, and channeling—water punching a preferred route around spent or compacted media—all leave measurable residual at the edge of the work zone. If the spray hits only one corner of a bag or mat, or if the unit is starved of media depth, the curb sample will still read chlorine even though “a dechlorinator was on the job.”
Pre-test prep that keeps residual under control
Before the first valve cracks, check media condition: free-flowing, not caked, exhausted, or past its field life. Stage containment bags or mats so the entire diffuser discharge lands in the treated zone, then anchor the assembly against thrust so the path does not walk or fold when full flow hits. Keep backup media on the truck so a clogged or depleted bed does not force you to shut down mid-test or discharge untreated water. Dosing judgment stays practical—match media mass and layout to the planned flow and duration, meet whatever residual your utility or permit expects at the point of discharge, and verify with simple field residual checks (strips or a handheld meter) at the curb rather than turning the street into a chemistry lab. When capacity, path length, and prep line up with the test you are about to run, the dechlorinator protects the environment without fighting the diffuser or the pitot measurement that still has to come next.
Stage in Fixed Order: Threads, Diffuser, Dechlor Path, Then Gauges
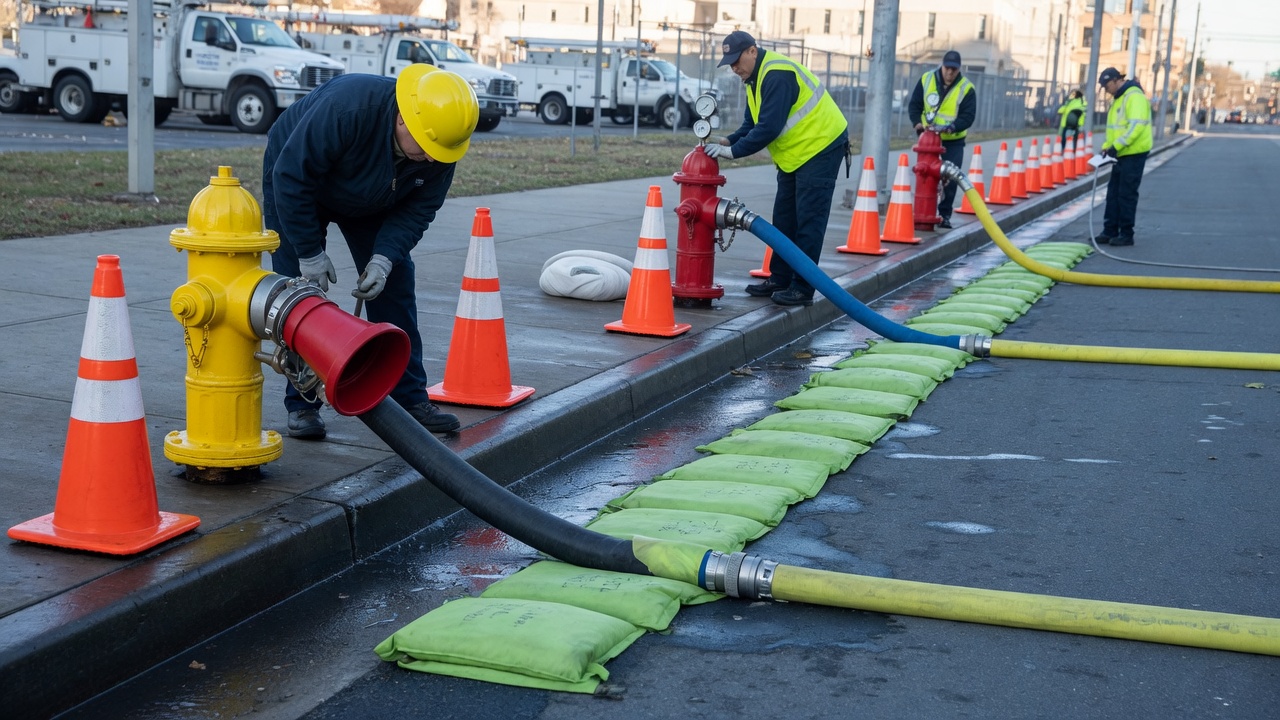
With diffuser geometry and dechlorinator capacity matched, setup can move to the hydrant itself without last-minute scrambling. Dress the flow hydrant in one fixed sequence every time—threads and gaskets first, diffuser next, dechlor path aimed and anchored, instruments last—so no one hangs bags, mats, or pitot lines in an order that forces rework once the valve is cracked under street pressure.
Attachment sequence that stays planted
Begin at the chosen outlet. Inspect and clean the hydrant threads; seat a sound gasket so the diffuser will seal without weeping or throwing the stream off-axis. Thread the diffuser hand-tight, then snug it so the discharge face points where you want the broken spray to land—straight into the dechlor trough, mat, or bag path, not across sidewalks, traffic lanes, or unprotected storm inlets. Orient any vane or port pattern for clean breakup and clear pitot access once flow starts. Only after the diffuser is locked and aimed do you lay out the dechlorination media fully under that aim path, contain the expected spray footprint, and anchor against thrust.
- Threads cleaned, gasket seated, diffuser orientation set toward dechlor path
- Dechlor media, containment, and backup staged under the intended spray footprint
- Thrust reaction controlled—hose or diffuser braced, chocked, or held so the assembly does not walk when the hydrant is cracked then fully opened
- Pitot and residual gauges brought in last, after the mechanical layout is fixed
Thrust is not theoretical. A steamer or high-band 2½-inch discharge will push hard the moment the valve opens; if the diffuser or any short hose section is free to whip or rotate, you lose aim into the dechlor path and risk injury or damaged fittings. Plant the setup before water moves. While the flow hydrant is being dressed, keep residual-gauge work coordinated on the separate residual hydrant: cap removal, gauge attachment, and readiness to read static and residual pressures can proceed in parallel so the team is not idle or crossing paths. Selection of which hydrants serve flow versus residual is already settled; this stage is only about simultaneous dressing so both ends are live when the test begins. When threads, diffuser aim, dechlor containment, thrust control, and gauges are finished in that order, the street layout is ready for controlled opening and valid pitot work through the diffuser.
Pitot Through the Diffuser: Steady Flow Without Turbulence Error
With the street layout dressed and both hydrants ready, the live-flow phase is only about opening cleanly and protecting the raw pitot reading. Diffusers and playpipes break the stream for safety and dechlor contact, but the velocity head still has to represent orifice discharge—not the spray after breakup. That means the pitot tip must sit in the solid core of the jet before the vanes or ports fully disrupt it.
Tip placement, immersion, and centering
Seat the pitot tip at the outlet plane, fully immersed and centered in the vena contracta. On a purpose-built flow-test diffuser, use the designated pitot port or window so the tip samples the jet while it is still coherent. On a playpipe or smoothbore, hold the tip square to the flow at the nozzle face—not angled into the expanding pattern and not pulled back into mist. Keep the stem clear of vane edges and gasket lips; any offset or partial immersion turns a clean velocity head into swirl-driven noise. The goal is a stable needle that other crews can later convert to available fire flow without second-guessing the hardware.
Open, clear air, then capture together
Crack the flow hydrant slowly to purge air and avoid water hammer against the diffuser and dechlor path. Bring the valve fully open and hold until the stream steadies and any diffuser chatter dies out. Only then take pitot and residual readings together. Chasing a wandering needle while the hydrant is still climbing or the diffuser is vibrating produces junk data. Steady flow first; simultaneous capture second.
Field tells of equipment-induced error—and the fix
Watch for signals that the diffuser, not the main, is corrupting the reading:
- Oscillating pitot needle — tip in swirl or chatter; re-center, reseat, or wait for the stream to settle
- Heavy mist on the gauge face — tip too far into breakup; pull back to the solid core or use the diffuser’s pitot port
- Obvious swirl or corkscrew spray — bent vanes, clogged ports, or bad aim; re-aim into the dechlor path or swap the diffuser
- Partial blockage or weak, uneven jet — debris or damaged gasket; shut down, clear, reseat, and re-take the pair of readings
None of these steps replace hydrant selection or later graphing. They simply keep the pitot input honest so the rest of the NFPA 291 chain stays valid while spray, runoff, and chlorine stay under control.
Route the Runoff, Verify Before Shutdown, and Leave a Clean Trail
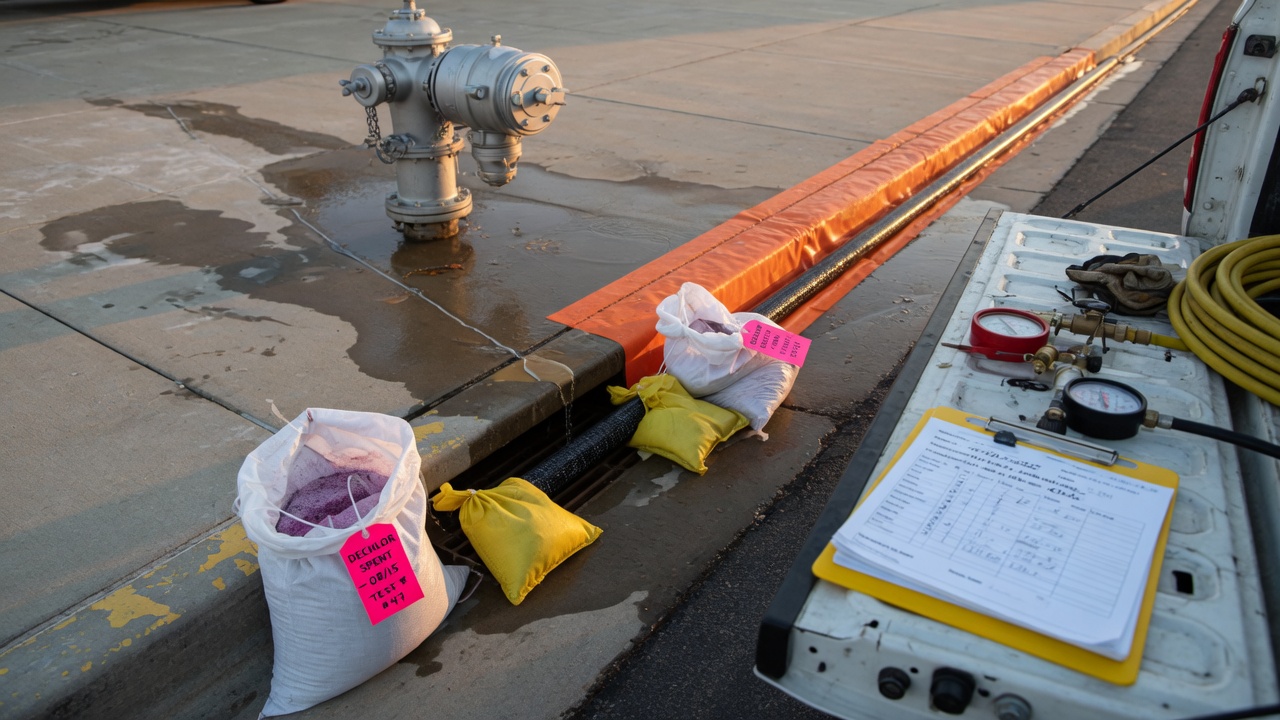
With the pitot input protected, the last job is keeping the broken stream where it belongs until the valve is closed. Route discharge along a gutter that carries clear of traffic and buildings, shield storm inlets with filter fabric or mats so solids and residual do not drop straight into the system, or send the spray onto an open-lot soak area that can accept the volume without ponding onto a neighbor’s property. If the only path available runs across a sidewalk, into an unprotected inlet, or onto ground the utility or municipality has ruled off-limits, pause the test. Better to reschedule or relocate than to force a discharge that violates local rules and undermines the very control the diffuser and dechlorinator were staged to provide.
Just before you close the hydrant, run a short end-of-flow check. Confirm the stream is still aimed into the dechlor path and that media has not been bypassed or washed aside. Glance at the pitot once more—needle steady, tip still in the solid core or designated port—then capture residual and pitot as a paired set. That final pair is what proves the hardware did not drift into turbulence or mist while you were watching the street.
Shutdown follows the reverse of staging. Close the hydrant smoothly, bleed residual pressure at the diffuser, then break the connection and lift the diffuser clear so grit does not score the threads or seat. Bag spent dechlor media separately; do not leave tablets, bags, or saturated mats on the curb for the next crew or the public. Rinse the diffuser, playpipe, and any trough or mat so chlorine residue and street grit do not travel to the next site and contaminate fresh media or clog ports. Stow gauges dry and capped. A few minutes of rinse-down keeps the kit ready and keeps the next test from inheriting someone else’s bypass or blockage.
Close the loop with minimal field notes that tie the gear to the numbers: diffuser type and outlet used, dechlor method and whether media stayed in the path, pitot and residual as a pair, and any runoff or inlet protection that mattered on that street. That is enough for an AHJ or utility reviewer to see that discharge was controlled and that the pitot input was taken through intact hardware—without turning the sheet into a full archive package. Done this way, the diffuser and dechlorinator finish as they started: part of a single measurement chain that keeps NFPA 291 data valid while spray, runoff, and chlorine stay under control.